How to create WiX custom actions
Content: Article Data Modified: September 12, 2020 8:14 PM Date Created: September 12, 2020 7:53 PM Tags: C# ⚡ URL: https://www.add-in-express.com/creating-addins-blog/2014/01/29/create-wix-custom-actions/
The WiX Toolset provides a number of standard actions that are sufficient for most installers. If, however, you need more flexibility over the installation process the WiX toolset provides custom actions.
In this example, we’ll write a simple custom action that will prompt the user to enter their product registration information. If this information is valid the installation will continue, if not, the installer will exit.
The WiX setup project
In my last article where we discussed how to implement a WiX installer upgrade, we’ve created a WiX installer project for a simple Windows Forms application. For this example, we’ll re-use the same setup and Windows forms project. To recap, our Product.wxs file was as follows:
<?xml version="1.0" encoding="UTF-8"?>
<Wix xmlns="http://schemas.microsoft.com/wix/2006/wi">
  <Product Id="*" Name="Win App" Language="1033" Version="1.0.0.0" Manufacturer="WinApp Software Inc." UpgradeCode="a9b1d837-9b09-491b-bd81-b794560745a4">
    <Package InstallerVersion="200" Compressed="yes" InstallScope="perMachine" />

    <MajorUpgrade DowngradeErrorMessage="A newer version of [ProductName] is already installed." />

    <Media Id="1" Cabinet="WinApp.cab" EmbedCab="yes" />

    <Feature Id="Executable" Level="1">
      <ComponentRef Id="Executable" />
      <ComponentRef Id="Documentation" />
      <ComponentGroupRef Id="RegistryGroup" />
    </Feature>

    <Property Id="WIXUI_INSTALLDIR" Value="INSTALLDIR" />
    <UIRef Id="WixUI_InstallDir" />

  </Product>

  <Fragment>
    <Directory Id="TARGETDIR" Name="SourceDir">
      <Directory Id="ProgramFilesFolder">
        <Directory Id="INSTALLDIR" Name="Win App">
          <Component Id="Executable" Guid="7B289C8E-6F5B-4A7B-A9A1-E78A89239714">
            <File Id="WinAppExe" Name="WinApp.exe" Source="..\WinApp\bin\Debug\Winapp.exe" Vital="yes" />
            <RemoveFolder Id="INSTALLDIR" On="uninstall" />
          </Component>
          <Component Id="Documentation" Guid="E4AA4677-6DDA-4746-A956-0A636DBB2995">
            <File Id="HelpRtf" Name="Help.rtf" Source="..\WinApp\bin\Debug\Help.rtf" Vital="yes" />
            <RemoveFile Id="RemoveReadMe" Name="ReadMe.txt" On="both"/>
          </Component>
        </Directory>
      </Directory>
    </Directory>

    <ComponentGroup Id="RegistryGroup">
      <Component Id="_69CB4E7B_273F_4510_B885_4633736280D0" Guid="2EC2BF60-997B-44BB-BA82-C5760FB48A19" Transitive="no" Directory="TARGETDIR">
        <RegistryKey Root="HKLM" Key="Software" ForceCreateOnInstall="no" ForceDeleteOnUninstall="no" />
      </Component>
      <Component Id="_A159385C_39DE_404D_833B_6F83828512C0" Guid="1D85B1A4-ABDD-4EB5-8E70-82C609462AEB" Transitive="no" Directory="TARGETDIR">
        <RegistryKey Root="HKLM" Key="Software\WinApp Software" ForceCreateOnInstall="no" ForceDeleteOnUninstall="no" />
      </Component>
      <Component Id="_AAF14A16_5774_4861_AD86_C21F01857F59" Guid="E5F8A3A2-209A-4297-8B01-F7BB4FC6603B" Transitive="no" Directory="TARGETDIR">
        <RegistryValue Root="HKLM" Key="Software\WinApp Software" Type="string" Name="License" Value="Free" />
      </Component>
    </ComponentGroup>

  </Fragment>

</Wix>
Creating the WiX custom action
In order to create a WiX custom action, we first need to add a new C# Custom Action project to our solution. You’ll find the project template for this under Windows Installer XML:
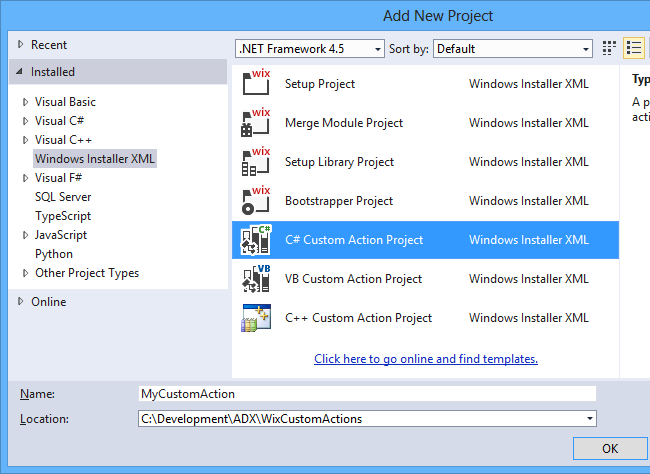
Adding a C# Custom Action Project template to the solution.
This project will create a custom action project that contains a CustomAction.config and CustomAction.cs file. For this example, we’ll focus primarily on the CustomAction.cs file.
Open the CustomAction.cs file and rename the CustomActionMethod1 method to ShowLicenseInfo and change its code to the following:
[CustomAction]
public static ActionResult ShowLicenseInfo(Session session)
{
    frmLicenseInfo frmInfo = new frmLicenseInfo();
    if (frmInfo.ShowDialog() == DialogResult.Cancel)
        return ActionResult.UserExit;

    return ActionResult.Success;
}
This code will cause the license information form to be shown once the custom action is invoked. If the user clicks the Cancel button on the license information form, the custom action will exit by returning ActionResult.UserExit. If the user enters the license information correctly and clicks the Next button, the custom action will return ActionResult.Success.
Since, we want to display a dialog to prompt the user to enter registration information, we first need to create the user interface. Start by adding a new Windows Form to your project.
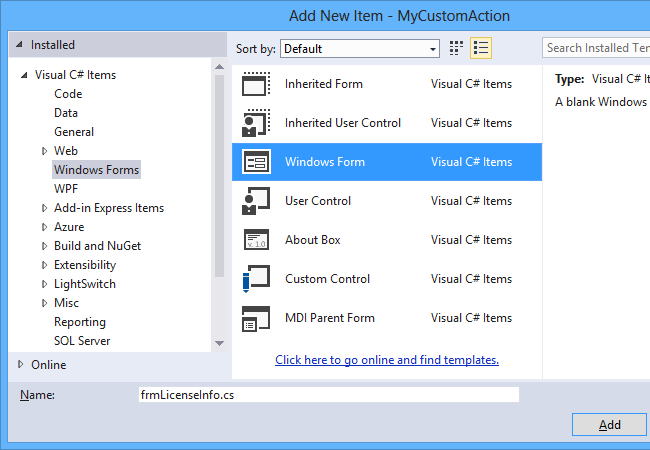
The design of the form should resemble the following image:

The design of the Windows form
Select the form in the Visual Studio forms designer and set its CancelButton to the name of the Cancel button, in this case it is btnCancel. This will ensure that when the user clicks on the Cancel button the dialog result of the form will be returned as Cancel.
Switch to the forms’ code-behind and add the following to the forms’ constructor:
public frmLicenseInfo()
{
    InitializeComponent();
    Application.EnableVisualStyles();
    this.TopMost = true;
}
The above code will enable visual styles for the form as well as make it the top-most form. If we do not set the TopMost property to true, the form will be hidden behind the standard WiX UI.
Now, double-click the Next button to generate a Click event handler for it and add the following code:
private void btnNext_Click(object sender, EventArgs e)
{
    bool valid = false;
    if (!String.IsNullOrEmpty(txtName.Text) && !String.IsNullOrEmpty(txtKey.Text))
        valid = VerifyLicenseInfo(txtName.Text, txtKey.Text);

    if (!valid)
    {
        MessageBox.Show("You license information does not appear to be valid. Please try again.", "Invalid info");
    }
    else
    {
        this.DialogResult = DialogResult.Yes;
    }
}
The code will first check whether the registration information has been completed and then call the VerifyLicenseInfo method. This method is used to validate the registration information and can either connect to a licensing server or run a license key algorithm to make sure the user has entered a valid product key.
Adding the custom action to the WiX source file (.wxs)
Next, we need to add the necessary XML mark-up to our Product.wxs file to show the license information form. Add the following to your Product.wxs file below the Product element:
<Fragment>
  <Binary Id="CustomActionBinary" SourceFile="$(var.MyCustomAction.TargetDir)$(var.MyCustomAction.TargetName).CA.dll"/>
  <CustomAction Id="LicenseInfoCustomAction" BinaryKey="CustomActionBinary" DllEntry="ShowLicenseInfo" Execute="immediate" Return="check"/>
</Fragment>
The Binary element must point to the DLL file that is generated by our custom action project. You’ll notice that we add .CA.dll to the end of the custom action projects’ target name. This is because the custom action project generates two DLL files. The DLL that ends in .CA.dll contains a format that is callable from the MSI engine and this is the file we need to reference.
Before you can reference it in the WiX source file, we first need to add a reference to the custom action project in our solution. To do this, right click on the References folder in the WiX setup project and select Add Reference…
In the Add Reference dialog, select the Projects tab and add the MyCustomAction project to the list of selected projects and components.

Adding the MyCustomAction project to the list of selected projects and components
The CustomAction element is used to specify the custom action we’ve created. The BinaryKey attribute points to the id of the Binary element we’ve added earlier and the DllEntry attribute should be the name of the method in the custom action that ought to be invoked, in this case set it to ShowLicenseInfo.
Finally, add the following inside the Product element:
<InstallExecuteSequence>
  <Custom Action='LicenseInfoCustomAction' Before='InstallFinalize'>NOT Installed</Custom>
</InstallExecuteSequence>
The above code specified that the custom action should be run before the InstallFinalize installation step. By setting the element value to NOT Installed, we told the WiX installer to only run the installation when it is not already installed, thus it will not run when the user uninstalls the application.
The complete listing for the Product.wxs file is as follows:
<?xml version="1.0" encoding="UTF-8"?>
<Wix xmlns="http://schemas.microsoft.com/wix/2006/wi">
  <Product Id="*" Name="Win App" Language="1033" Version="2.0.0.0" Manufacturer="WinApp Software Inc." UpgradeCode="a9b1d837-9b09-491b-bd81-b794560745a4">
    <Package InstallerVersion="200" Compressed="yes" InstallScope="perMachine" />

    <MajorUpgrade DowngradeErrorMessage="A newer version of [ProductName] is already installed." />

    <Media Id="1" Cabinet="WinApp.cab" EmbedCab="yes" />

    <Feature Id="Executable" Level="1">
      <ComponentRef Id="Executable" />
      <ComponentRef Id="Documentation" />
      <ComponentGroupRef Id="RegistryGroup" />
    </Feature>

    <Property Id="WIXUI_INSTALLDIR" Value="INSTALLDIR" />
    <UIRef Id="WixUI_InstallDir" />

    <InstallExecuteSequence>
      <Custom Action='LicenseInfoCustomAction' Before='InstallFinalize'>NOT Installed</Custom>
    </InstallExecuteSequence>

  </Product>

  <Fragment>
    <Binary Id="CustomActionBinary" SourceFile="$(var.MyCustomAction.TargetDir)$(var.MyCustomAction.TargetName).CA.dll"/>
    <CustomAction Id="LicenseInfoCustomAction" BinaryKey="CustomActionBinary" DllEntry="ShowLicenseInfo" Execute="immediate" Return="check"/>
  </Fragment>

  <Fragment>
    <Directory Id="TARGETDIR" Name="SourceDir">
      <Directory Id="ProgramFilesFolder">
        <Directory Id="INSTALLDIR" Name="Win App">
          <Component Id="Executable" Guid="7B289C8E-6F5B-4A7B-A9A1-E78A89239714">
            <File Id="WinAppExe" Name="WinApp.exe" Source="..\WinApp\bin\Debug\Winapp.exe" Vital="yes" />
            <RemoveFolder Id="INSTALLDIR" On="uninstall" />
          </Component>
          <Component Id="Documentation" Guid="E4AA4677-6DDA-4746-A956-0A636DBB2995">
            <File Id="HelpRtf" Name="Help.rtf" Source="..\WinApp\bin\Debug\Help.rtf" Vital="yes" />
            <RemoveFile Id="RemoveReadMe" Name="ReadMe.txt" On="both"/>
          </Component>
        </Directory>
      </Directory>
    </Directory>

    <ComponentGroup Id="RegistryGroup">
      <Component Id="_69CB4E7B_273F_4510_B885_4633736280D0" Guid="2EC2BF60-997B-44BB-BA82-C5760FB48A19" Transitive="no" Directory="TARGETDIR">
        <RegistryKey Root="HKLM" Key="Software" ForceCreateOnInstall="no" ForceDeleteOnUninstall="no" />
      </Component>
      <Component Id="_A159385C_39DE_404D_833B_6F83828512C0" Guid="1D85B1A4-ABDD-4EB5-8E70-82C609462AEB" Transitive="no" Directory="TARGETDIR">
        <RegistryKey Root="HKLM" Key="Software\WinApp Software" ForceCreateOnInstall="no" ForceDeleteOnUninstall="no" />
      </Component>
      <Component Id="_AAF14A16_5774_4861_AD86_C21F01857F59" Guid="E5F8A3A2-209A-4297-8B01-F7BB4FC6603B" Transitive="no" Directory="TARGETDIR">
        <RegistryValue Root="HKLM" Key="Software\WinApp Software" Type="string" Name="License" Value="Free" />
      </Component>
    </ComponentGroup>

  </Fragment>

</Wix>
After building the solution and running the MSI, you ought to see the license information form just before the installation finishes.
Thank you for reading. Until next time, keep coding!